
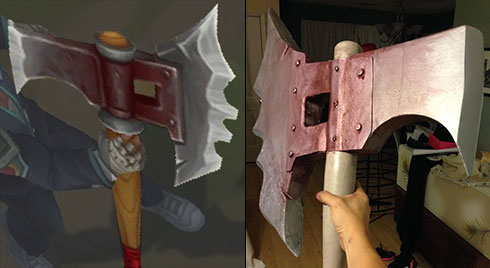
Something I never did in a timely fashion that I remembered that I wanted to write about, was a post about the construction of the Academy Darius axe I had made for my corresponding costume, that I wore to Worlds.
Two key challenges were in play when constructing this prop: time, despite the fact that I had the idea to make this costume for quite some time, I’m stupid and waited until later in the game to start, everything, including the axe.
Additionally, there were size limitations to the axe; because I was transporting this prop in my luggage to Europe, it had to be able to fit inside of a standard full-size piece of luggage. My solution to the size limitations was to modify the scale of the axe in general, as well as creating the axe in components, fit inside of luggage in pieces, and be somewhat easy to re-construct and break down in Brussels and Berlin.
Ultimately, I would say the size of the axe isn’t 100% scale, but when it comes to League props, 100% scale isn’t always realistically feasible; otherwise, I would’ve had a 56” Riot Graves gun that probably would have weighed 30 lbs, and my pink Taric hammer would’ve been taller than me and more than 60” hammerhead.
But anyway, here’s a fairly quick run down of what I used, how I did it, and the general process of how I made an Academy Darius axe in a week.
For the most part, most of the work on the axe pertained to the blade, since I had decided that I was going to use an actual toy bat for the bat handle of the weapon, since I figured it should be easy enough to locate an adequate bat in terms of length to utilize; that assumption was grossly incorrect, and I spent way more time than expected before finally finding one on Amazon Prime that could be used, but the key is that I did find one.
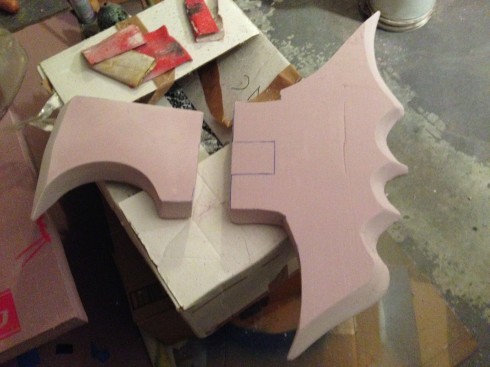
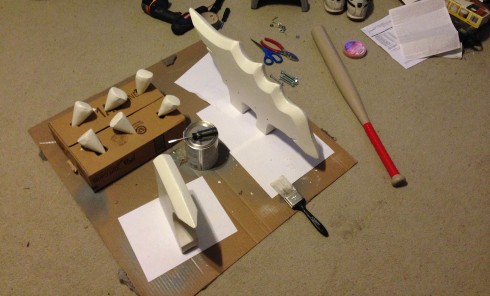
Anyway, once the size of the blade was determined, I made paper templates of the general shapes in Illustrator, and traced them onto my go-to building material, pink insulation foam. Frankly, I couldn’t care less if they were any other color, but I get my stuff at Home Depot, where they’re all Pink Panther-branded pink foam. 2” thickness was more than adequate and fairly accurate to what I had in mind.
The best part about pink insulation foam is that it’s pretty sturdy, rigid, and most importantly takes very well to shaping by sanding. I’m fairly confident that I can generally shape most things in insulation foam, as long as it’s not too mind-bending complex, and as far as creating the two ends of the axe blades, it is simple.
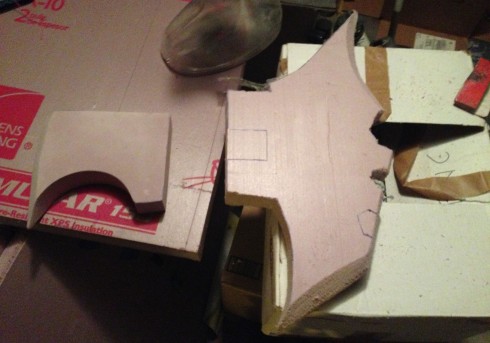
Upon completion of the general shapes comes the beveling of the edges. As much as I would love to take every piece of foam to my belt sander, and grind things out in seconds, this is a task best done by hand, because it requires more finesse, and frankly a belt sander can’t efficiently deal with lines that curve inward, with a tremendous amount of patience, skill and steady hands.
Basically, I start off with a destructive 40 grit sandpaper to shape the edges down to fairly rough 45 degree angles. Then, I go over them again with a finer grit sandpaper, typically like 140-160 grit, to smooth them out a good bit. And once satisfied, I go over them one last time with a finishing 220 grit sandpaper to really smooth out the surfaces, and clean up a lot of loose shards and edges.
The above image is the end result of the beveling.
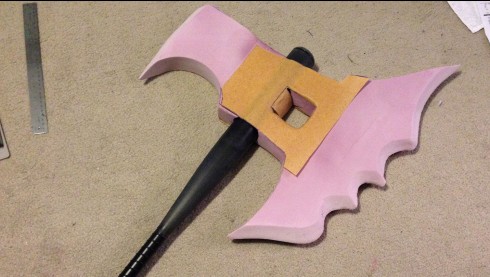
The bat I purchased thankfully had a flat barrel, like a softball bat, as opposed to the gradually widening girth of a baseball bat. That said, on account of flat simplicity, I wrapped a piece of 140 grit sandpaper around the barrel, and grooved some channels into the flat edges of the blades, so that they would kind of curl around the barrel upon completion.
The “connector” pieces are made from Worbla, and would act as the pieces that would join everything together. Ultimately, they would screw into the bat, as well as be the sheets in which both the blades would bolt through to connect everything together.
I ran a heat gun over the center part, so that there would a portion of the Worbla pieces that hugged around the barrel of the bat, and make connectivity fairly idiot-proof.
One of the knocks that insulation foam gets is that it can’t be spray painted. This is irrefutable fact, you cannot spray paint insulation foam; some allege that it will eat through foam, but my personal experience shows that it simply just kind of beads up and never cures.
However, a workaround for this is to prime any pieces you want to paint. Like you would prime a floor, wall or any surface in a house that you want to paint, the same principle rings true with insulation foam. Using a brushable paint primer, like KILZ,* simply coat all pink surface with primer, and once dry and fully cured, you now have insulation foam pieces that are spray paintable.
*Don’t bother trying to use spray primer; long story short, it’s basically the aerosol in spray cans that prevents proper cohesion to insulation foam
2-3 coats should do the job, but it should be worth noting that it’s extremely important to let each coat really fully cure before applying the next coat; you’d think that such a concept seems like a no-brainer, but if you’re dumb like me, you apply additional coats simple when the surface is not tacky to touch, and basically end up with a surface that hasn’t fully kicked, leading to some rough patches. Additionally, I like to take 220 grit fine sandpaper and try and get a silky smooth finish on primed surfaces, but if you don’t get fully-cured primer, such becomes impossible without bubbling or warping.

This is the axe at like 80% completion. The blade portions have been painted, and if you look closely, you can see where all the bolts and screws have gone into the respective parts. Screws hold the Worbla pieces into the bat, and 2.5” bolts through the Worbla are what hold the blade pieces flush to the bat.
Also, the bat painted, and the handle taped up. At this point, no weathering has yet been done.
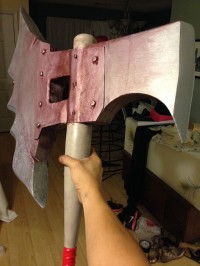 And this is the axe, at like, say 90% finished. It’s also the last picture I took of the axe, because I was short on time prior to Worlds, and I’m not motivated to dig the pieces out of storage to assemble for a genuine beauty shot.
But it’s sufficient enough to show the (rushed) paint job, and slightly clearer idea of the connecting points between bat, Worbla and blade pieces with screws and bolts.
The only things missing from the final product are the rings above and below the base of the Worbla pieces on the bat, as well as the one thick ring that went above the handle. Also, the bat itself was not at 100% weathered and colored in this picture.
 Anyway, here’s a picture of me in full costume, with the finished axe, that the mythical girlfriend was gracious enough to take of me while we were at the semifinals in Brussels.
Overall, I’m fairly pleased with how the axe turned out for as little time that went into it in the end. Yeah, it was cocky and presumptuous of me to wait as long as I did prior to starting it, but all things considered, I think the end result was decent, and something that I don’t mind sharing, even the things that I think are shortcomings about it.
Sure, if I had more time and spent more time on some of the finer things, like sanding and priming, I might have had a slightly cleaner and refined looking end product, but honestly I can’t say that a tremendous amount of things about what I did in the end would’ve been that dramatically different.
Regardless, an Academy Darius axe in a week – master crafter I am not, but it’s not impossible, and this is how I made one.