
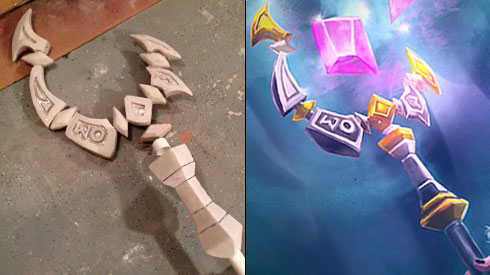
This particular progress update isn’t anything that spectacular when it comes to any fascinating build processes or anything, but at the same time I’m very happy with this particular update, because it pretty much marks the end of the core shape making and Shell Shocking. At the very end of it, I have a pretty good baseline of what most of the staff is going to look like towards the end, and if I had to put a number on top of it, I would say that I am around 80% complete.
But since I’m trying to do my best to be dutiful and show as much of the process as possible, it still constitutes as an update that shows how we came to be at this current stage of the construction process.
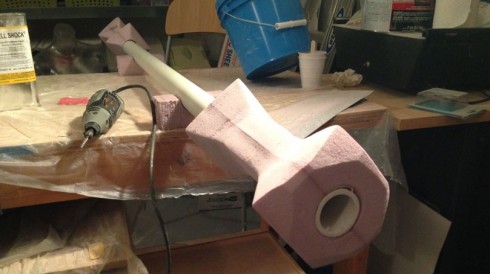
As mentioned in a prior update, what’s going to hold the crown of the staff onto the rod itself is going to be a (hopefully) sturdy bolt, bolted onto a pipe cap. This is probably going to be one of the most tense parts of the build, drilling and trying to get the bolt to fit into a Shell Shock plug into the bottom of the crown, but if all goes well, I’m going to be ecstatic.
Anyway, although it’s insulation foam in which everything is shaped from, it’s still pretty dense stuff. It’s not like I could ram and cram the cap onto the top of the pipe, and the foam underneath it would miraculously disintegrate in the process; nope, it’s got to go somewhere. So although it doesn’t come out looking all that pretty, I used a Dremel to bore out the requisite space to compensate for where the cap will need to go. The lowest speed is all I really needed, because it’s still just foam, and I also don’t want to fuck up the pipe too badly to a point where it compromises the integrity or shape of the pipe to any substantial degree.
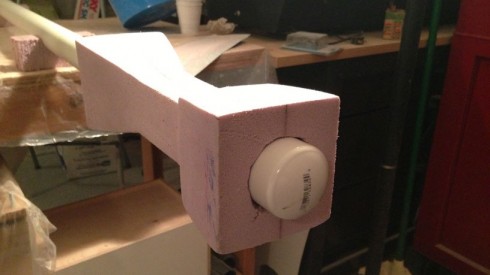
Basically, this is what I’m going for in the end. I’m not going to push the cap down all the way, because these are tight-fitting things, and affixing it now would essentially mean it’s never coming off later. I don’t want that yet. If all goes according to plan, it will sink into the gap snugly, and if it goes too deep, that’s not a bad thing, and I will use either more Shell Shock or bondo fill any cracks and gaps and sand the top smooth, with a bolt sticking out of it.
This process was repeated at the bottom end of the staff as well, since there will eventually be a fixture to add there as well.
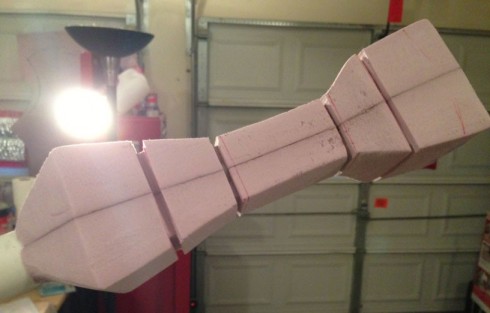
Next, was addressing the indentations in the staff neck and base. Although I had some initial trepidations for cutting into these blocks, they’re still a key detail in the design of the staff. Not to mention the reluctance of possibly compromising the integrity of the blocks themselves by cutting into them in segments, but if you adhered everything correctly, it shouldn’t be that big of a concern. Fortunately for me, I had adhered everything correctly and thoroughly.
To cut into the foam, I actually killed two birds with one stone in this process by using a 1/8” thick file, on its edge side. It was just thick enough to accurately bore a suitable width into the foam in nice straight lines, as well as doing the smoothing down in the process.
Also, I’m not sure if I’ve mentioned this prior, but it’s vitally important (fail for me, that’s the case): When shaping foam in preparation for Shell Shocking, ALWAYS compensate for the mass that will be added by Shell Shock. Meaning, for example, if you have a block that you want to be 8” in the end, cut the foam block to be something like 7.75”, because you’re going to need at least 2-3 good coats of Shell Shock to sufficiently coat it, which should in theory make up for the last quarter of an inch.
The filing method to bore out my indentations accomplished this task pretty well, because after Shell Shocking, I knew that the overall depth and width of these cuts would be shrunken to a point where I was more comfortable with.

And then it’s back to the Shell Shocking process all over again. My legs and knees were shot pretty badly from the repeated squatting down to apply the stuff in short allotted time bursts, but the way I had it set up, was like putting it on a spit; I could apply Shell Shock to two sides, and rotate it afterward, to prevent any annoying drips to pervade on the adjacent sides.
Two coats did a sufficient job of covering everything, and then once again, it was back to the sanding process. I assumed that it would be easier to sand, because everything was fairly flat and straightforward in terms of angles, but whenever you’re dealing with any sort of interior angle, it’s a nuisance to not collide with the next edge.
That and the fact that I was listening to a baseball game on the radio at the time, I actually sanded the neck and base down by hand, so that the whirr and sound of my mouse sander wouldn’t drown out the radio. But for what it’s worth, I do find that hand sanding with a sheet of 40-grade super-grit sandpaper, before upping grades to smooth surfaces out, works better than a mouse sander. The human hand is far better at addressing warps, divots and uneven surfaces than a little machine can. Sure, when bearing down too hard can lead to some scratches, but with the case of Shell Shock, everything is going to be painted over in the end anyway, so I’m not that concerned with it, as long as the end result is smooth.
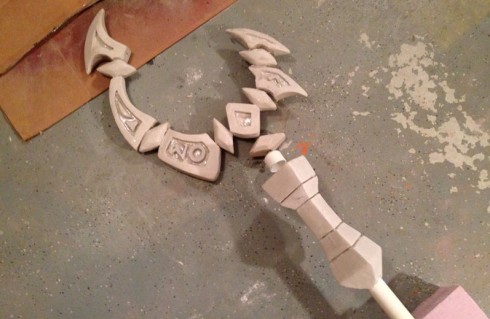
And here we have the end result, sort of, with only the neck being shown in this picture. It’s silky smooth and ready to paint now. But this is a general idea of what the staff is supposed to look like in the end, and it’s nice to have this much at this point.
What’s left? The first thing I’ll attempt to tackle is the bottom tip of the staff, which I’ll likely be learning something new, diving into the world of casting and creating a pliable and shatterproof piece for the bottom tip, due to the fact that this will be the end that will be on the ground most of the time.
And then in another, more annoying aspect of the staff as a whole, is addressing the three crystals that “hover” in the proximity of the staff. Since no level of skill exists in which gravity can be defied for prolonged time periods, as much as I hate the idea of visible wires and/or rods protruding or being affixed to the staff, for completion’s sake, something will have to be done to visually convey them. As for the crystals themselves, I have a feeling is going to require learning how to slushcast them.
Finally, there’s the obvious overall assembly and painting of the staff entirely. And then voila, we have a LeBlanc staff.
gg easy noobs, right??